Fitst you can check how to create a Lightbox to help you to manage Mediabox CK.
Manually by coding
You can create the link directly from your editor, or anywhere you want.
Mediabox CK will search for all links that have the attribute rel="lightbox" (you can change the attribute name and type in the plugin options). To use the lightbox on your link you must add it the attribute like this :
<a href="/mypage.html" rel="lightbox">Link title</a>
The href can point to a link, to an image, a video or anything else.
Group your medias in an album
To create an album or add some special parameters, you shall edit the html code and add yourself the rel attribute on the link with the tag <a>. Example : rel="lightbox[albumname]"
<a href="/mypage.html" rel="lightbox[myalbum]">Link title of 1st link</a>
<a href="/mypage2.html" rel="lightbox[myalbum]">Link title of 2nd link</a>
Both links will be displayed into the Lightbox and you can navigate through them using the navigation arrows.
Give specific dimensions to a media
You can also want to override the general settings of the plugin and ask it to open the media with a specific width and height. You can set them in the rel attribute. Example : rel="lightbox[width height]"
<a href="/mypage.html" rel="lightbox[640 480]">Link title</a>
And combined dimensions with an album :
<a href="/mypage.html" rel="lightbox[myalbum 640 480]">Link title</a>
Using a tag
Mediabox CK Pro can also manage the tag to help you to create your lightobx.
You can also use a tag to create a link automatically based on the parameters you write in it. This is useful to put a text anywhere in your page and create a link (if you don't have any html editor available) or if you have some difficulty to add the attribute to your link.
The Mediabox Tag is also the method that allows you to load directly all images from a folder. Then you will click on the generated link and all images from the folder will be shown into the Mediabox CK popup, grouped into an album so that you can navigate through them.
This is the text that you must write :

The tag can have multiple parameters, all separated with a "|" (vertical bar).
List of all parameters :
src= : source media to show in the popup, it can be an image or video or url
w= : lightbox width in px
h= : lightbox height in px
alb= : album name to group the medias and show the navigation
t= : title and description shown under the media, separate them with a double point ::
dir= : load automatically all the images contained in the folder, then you can navigate through them into the lightbox. If you use this, you don't need the 'src' parameter.
gallery=1 : to load automatically all the images in a gallery
effect= : name of the effect from Image Effect CK to apply to the images in the gallery
nb= : number of images to load in the gallery. If the pagination is active, this will setup the number of images per page, else the gallery will show exactly this number of images
random=1 : load the images in a random order
order=labels : define the order of the images to be the same order as defined in the labels.txt file. See the doc for more info
autoload=1 : load the popup on page load. See the doc for more info
pagination=1 : display a pagination and limit the number of images to be shown in the same time
sort= : asc or desc. By default the value is asc, you can use this setting if you want to show your images in the inverse order
Using the interface
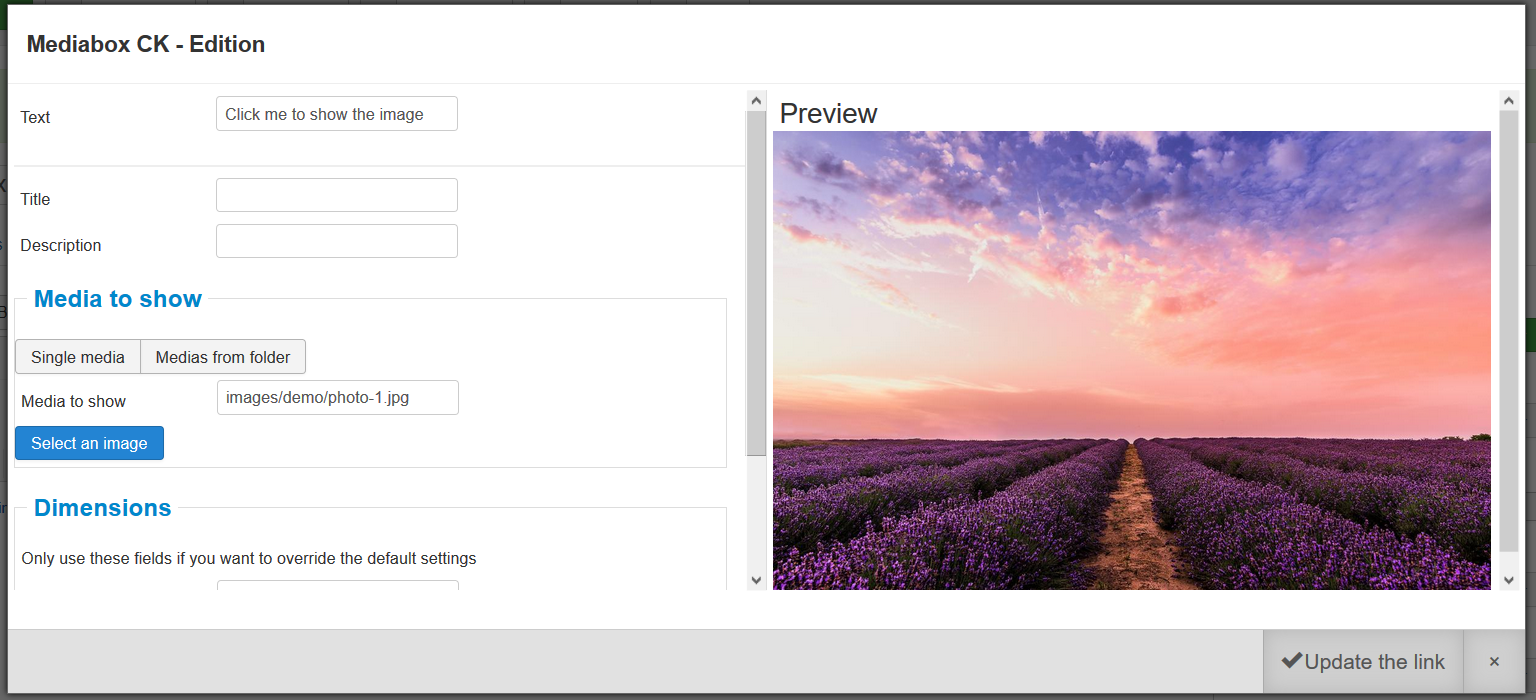
The interface is available on the Pro version. You can do multiple things
- Set the text do display as link
- Give a title and description that will be shown in the Lightbox popup
- Select an image from the Joomla media manager
- Select a folder from a tree just by clicking on it (list all folders in the 'images' folder)
- Set specific width and height for your Lightbox
- Set an album name to group the media with other ones in the page
- Choose if you want to insert a HTML link (on text or image) or if you want to create a tag


News